I spent two years organizing the same bins over and over. New baskets, new shelf liners, a label printer I never actually used because it required a Bluetooth connection and a phone app that kept disconnecting. The pantry would look good for about ten days, and then my husband would put the rice in the "PASTA" bin and my kids would just stop reading labels entirely. Not because they didn't care. Because the labels I'd made were faded, crooked, or in a six-point font nobody over thirty can read at a glance.
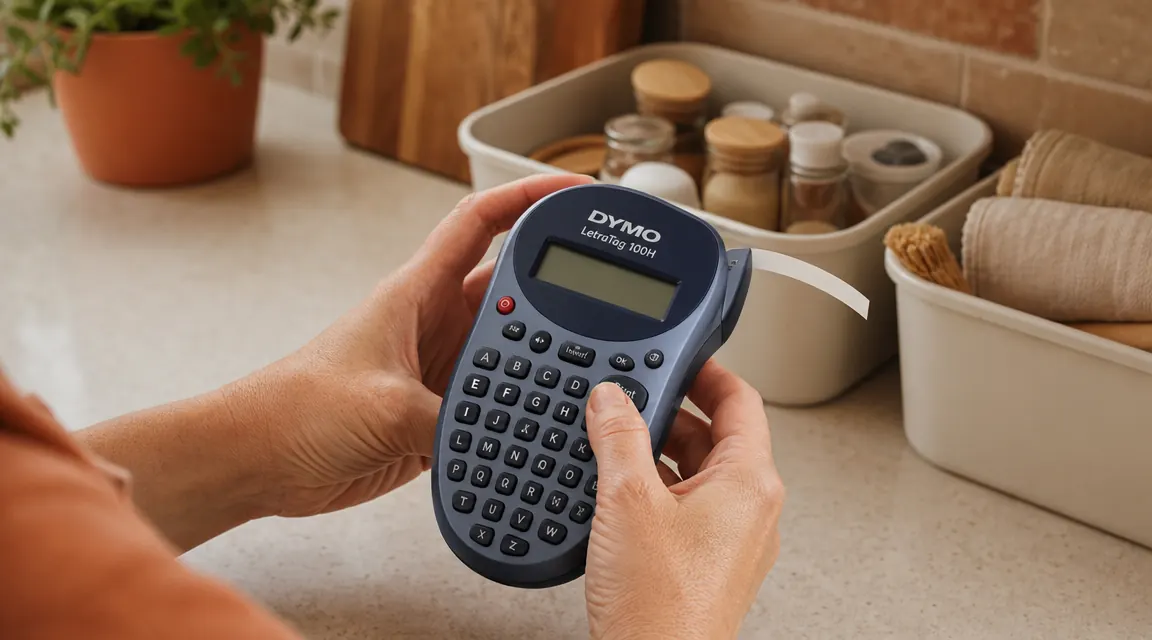
Labeling a whole house sounds like a weekend project. It's actually a single afternoon if you go room by room with a system. I labeled 53 bins, 14 shelf zones, and 8 drawer fronts in about four hours on a Saturday using the DYMO LetraTag 100H, a handheld label maker that doesn't require a phone, a WiFi connection, or a tutorial video. The labels have been on since March and not one has peeled. Here is exactly how I did it.
Stop relabeling the same bins every few months. The DYMO LetraTag 100H prints, peels, and sticks in under ten seconds per label.
Rated 4.7 stars from over 31,000 reviews. Comes with 3 label tapes so you can start the moment it arrives.
Amazon Check Today's Price on Amazon →Step 1: Walk Every Room and Audit What Actually Needs a Label
Before you print a single label, do one lap of your home with a notepad or your phone's Notes app. In each room, count the number of bins, baskets, drawers, and shelves that hold things other people in your house need to find independently. I don't mean things only you use. I mean things your spouse looks for, your kids dig through, or you hunt for in a rush. Those are the things that need labels.
My list came out to about 75 items across six rooms. That sounds like a lot until you realize that printing a label on the DYMO LetraTag takes about eight seconds. You type the name on the keyboard, hit print, peel, stick. You don't need to be at a computer. You don't need tape cassette software. The whole label-making part of this project is legitimately the fastest part.
Resist the urge to label everything. A drawer full of your own craft supplies that nobody else touches does not need a label. A bin of holiday decorations in the attic that only you unpack once a year does not need a label. Save your label tape for the shared, high-traffic zones. That focus is what makes the system stick.
Step 2: Decide on a Naming Convention Before You Print Anything
This is the step most people skip, and it's why their labeling projects fail. They print "MISC" and "OTHER" and "STUFF" and wonder why nobody respects the system six weeks later. A good naming convention has three rules: names are specific, names are shared vocabulary (no nicknames only you understand), and names are consistent across rooms.
I use category-first naming. Instead of "Tylenol," the bin says "MEDICINE." Instead of "Maya's Stuff," the shelf says "SCHOOL SUPPLIES." Instead of "Thingy Drawer," I labeled it "BATTERIES + REMOTES." If two people in your house would disagree on what to call something, pick the more obvious name. You want a seven-year-old to be able to find the tape without asking you. That is the actual test.
The DYMO LetraTag 100H has nine font sizes. I use size 4 for pantry bins (you're reading from about two feet away) and size 5 for closet shelves (you're reading from four to six feet). Size 6 for the garage, where visibility across the room matters. Size 3 is useful for small drawer fronts where you're labeling a narrow strip. Write down your size plan before you start so every room is consistent. Inconsistency is what makes a labeling system look like a hasty Pinterest fail.
Step 3: Start with the Pantry and Kitchen, Then Move Outward
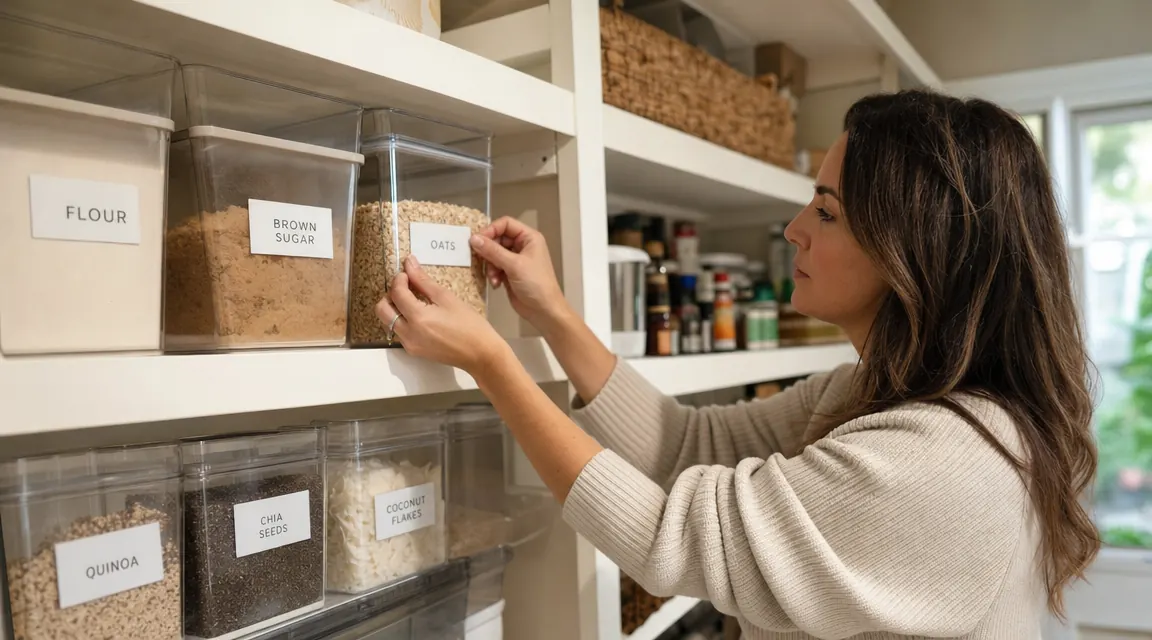
Start in the kitchen because it has the highest daily traffic and the most visible payoff. When you finish and walk away, you'll feel the momentum to keep going. My pantry has four shelves. The top shelf has bins for baking: FLOUR, SUGAR, BAKING SODA + POWDER, CHOCOLATE CHIPS. The second shelf is grains and pasta: each bin gets a specific label, not a group label, because my family cannot be trusted to open a bin called "GRAINS" and look inside. Third shelf is canned goods by category: BEANS, SOUPS, TOMATOES. Bottom shelf is snack bins for the kids.
The LetraTag's laminated tape is what makes pantry labels work. The label doesn't fog up from humidity, it doesn't peel when you grab a bin with slightly damp hands, and it doesn't yellow under a warm pantry light the way cheap masking-tape-and-Sharpie labels do. I have labels from eight months ago in my pantry that still look like I printed them this week.
After the pantry, do the rest of the kitchen: junk drawer zones (BATTERIES, TAKEOUT MENUS, TOOLS), cabinet shelves for medicines, and the cabinet under the sink. Under-sink labels are especially useful. "CLEANING SPRAY," "DISH SOAP REFILLS," and "GARBAGE BAGS" sounds obvious until you realize you've been opening that cabinet in the dark on a Sunday morning trying to find the Windex. A four-second label print saves you about thirty seconds of squinting per week.
Step 4: Do Every Closet in the House Back to Back
Closets are the easiest room to label because most of the surfaces are at eye level and the contents don't change much. Start with the linen closet. Label each shelf by zone: TOWELS, BED SHEETS (QUEEN), BED SHEETS (FULL), EXTRA BLANKETS. If you have a bin or basket for medicine on a closet shelf, label it FIRST AID. These labels matter most for guests, for the babysitter, for anyone in your house who isn't you.
Clothing closets need labels less than storage closets, but label any bins on the floor or high shelves where items are out of sight. "WINTER HATS + GLOVES," "BELTS," "OFF-SEASON SHOES" on a high shelf stops you from pulling down every bin every fall looking for the thing you put away wrong last spring.
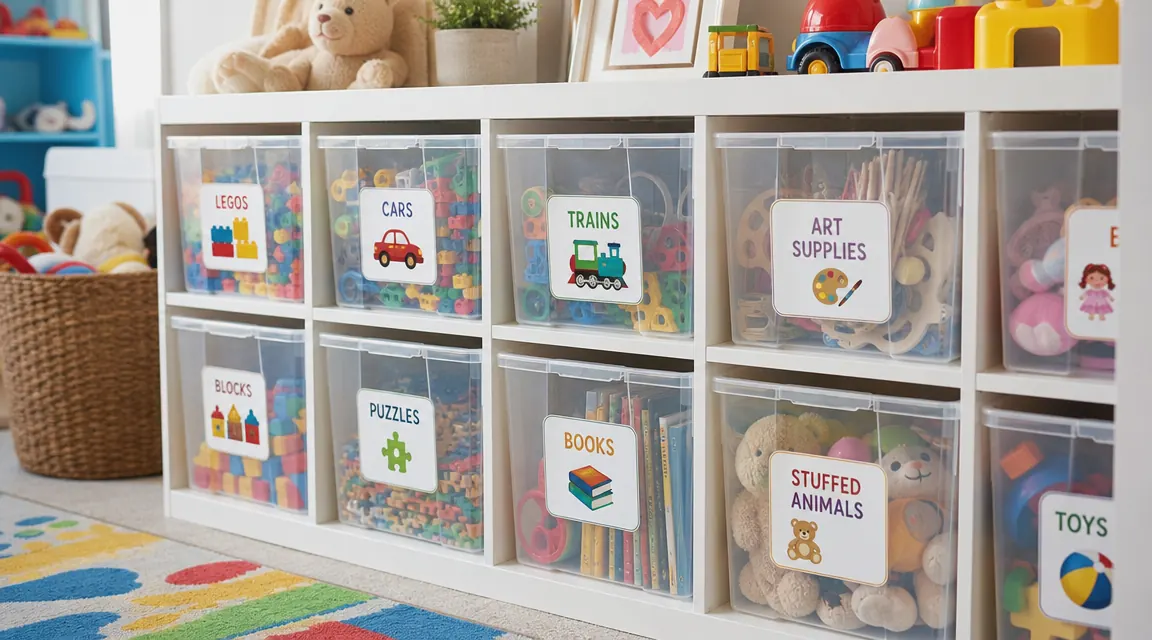
The kids' room closet is where labels earn their keep the most. My daughter's closet has six bins. LEGOS. STUFFED ANIMALS. ART SUPPLIES. PUZZLES. BOOKS. DRESS-UP. She is nine. She can now clean her room without asking me where anything goes, because there is no ambiguity. That is worth the twelve labels it took to get there.
Step 5: Finish with the Garage and High-Traffic Utility Spaces
Save the garage for last because it requires bigger font, more surface area, and a slightly different tape. The LetraTag's standard white LT tape works fine indoors, but for the garage I switched to the clear tape that comes in the kit so the labels blend onto dark bins without looking slapped on. Label each shelving zone by category: AUTOMOTIVE, GARDENING TOOLS, SPORTS + OUTDOOR, HOLIDAY DECOR, PAINT + TOUCH-UP. Bin labels, shelf-edge labels, and if you use a pegboard, you can label the board itself above hook clusters.
For utility rooms and laundry rooms, label the shelves above the washer and dryer: DETERGENT, SOFTENER, STAIN REMOVER, CLEANING RAGS. Label storage bins for seasonal items. Label the inside of cabinet doors if you store sprays or small bottles there. These are ten-second prints that you will notice every single week.
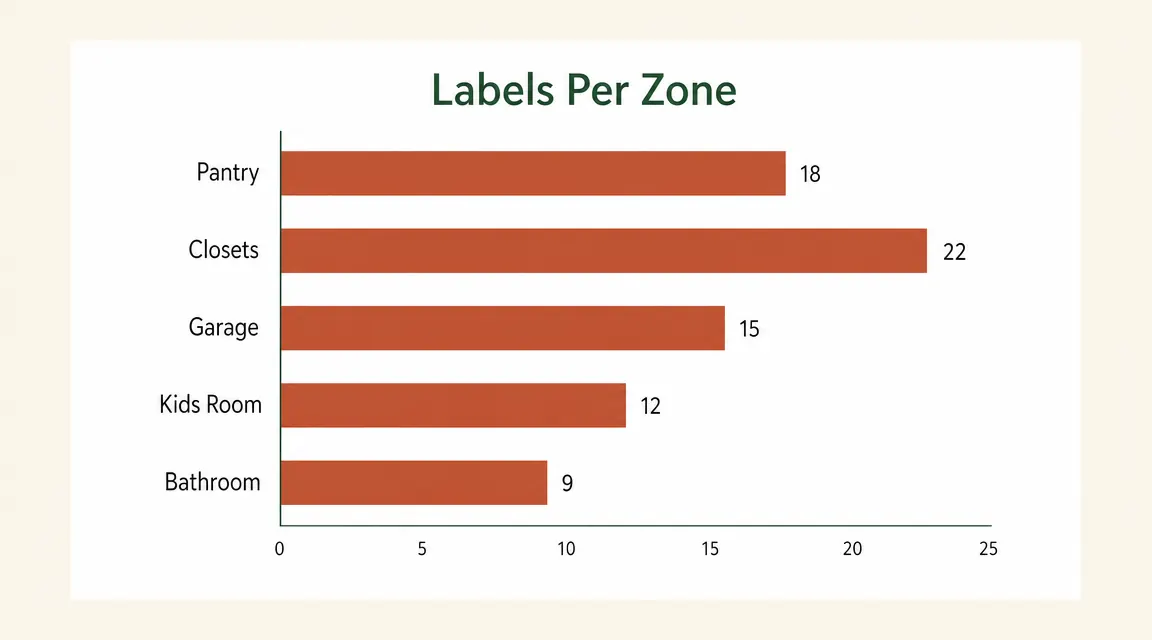
By the time I finished the garage, I had printed 53 labels in just under four hours including breaks and a lunch. The LetraTag used about one and a half tapes of the three included in the kit. I still have tape left for any bins I add going forward. Tape cassettes for the LetraTag run about eight to ten dollars each for a three-pack, and each tape prints roughly 30 to 50 labels depending on character count. This is not a system that costs you money to maintain.
What Else Helps
Labels are the last step of organizing, not the first. Before you print anything, the bins and baskets you're labeling need to be in their permanent spots. If you're still moving things around, wait until the containers are placed and you're confident in the zones. A label on a bin that gets relocated is a label that confuses more than it helps. Also, use the same label maker for every room. Mixed label types, some printed, some handwritten, some from a different machine with different fonts, is what makes a labeling project look unfinished. One tool, one font family, one afternoon. That's the whole system.
My daughter is nine. She can now clean her room without asking me where anything goes, because there is no ambiguity. Twelve labels did that.
If you want a deeper look at how the DYMO LetraTag 100H holds up over months of real use across a whole house, I covered it in detail in my long-term review. And if you're still on the fence about whether a label maker is worth the cost at all, my 10 reasons a label maker finishes any organizer system covers exactly why bins without labels are bins that eventually become junk piles again.
One afternoon, one label maker, every bin in the house finally readable by everyone who lives there.
The DYMO LetraTag 100H prints laminated labels in under ten seconds. No app required, no Bluetooth, no tape-software nonsense. It works the moment you take it out of the box.
Amazon Check Today's Price on Amazon →