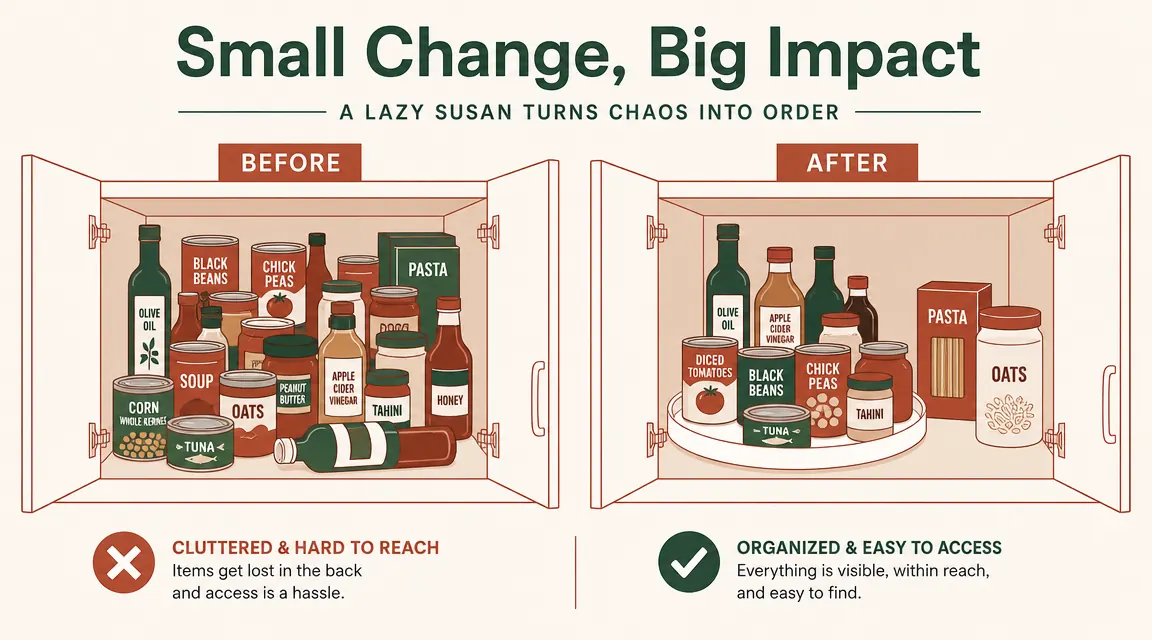
Deep cabinets lie to you. You stack things in there with good intentions, and six weeks later you are pulling out four cans of coconut milk just to find the cumin you know you bought last month. The back of a deep pantry shelf is a black hole: you can see it exists, but you cannot retrieve anything from it without emptying half the shelf first. Items expire in there. Doubles accumulate because you forgot the first one was there. You stop using the cabinet except as a dumping ground, and then one afternoon you spend forty-five minutes reorganizing it only to have it revert to chaos inside two weeks. This is not a willpower problem. It is a geometry problem, and it has a cheap, fast solution.
A non-skid turntable, specifically the Copco 12-inch lazy susan, fixes the geometry. When everything sits on a spinning platform, the back of your cabinet stops being unreachable. One spin and whatever was hiding in the dark is now front and center. I have put this thing in three different cabinets over the past two years: the spice cabinet over my stove, the deep corner shelf in my pantry, and the cabinet under my bathroom sink. The setup takes about twenty minutes the first time. The system holds without any weekly maintenance. Here is exactly how I do it.
Your cabinet has a back half you never use. A 12-inch turntable fixes that today.
The Copco Non-Skid Lazy Susan has a 4.7-star rating from over 25,000 buyers. The non-skid base keeps it from creeping across the shelf, and the low-profile rim keeps tall bottles from tipping when you spin it. Check today's price before you start measuring.
Amazon Check Today's Price on Amazon →Step 1: Measure Your Cabinet Before You Order Anything
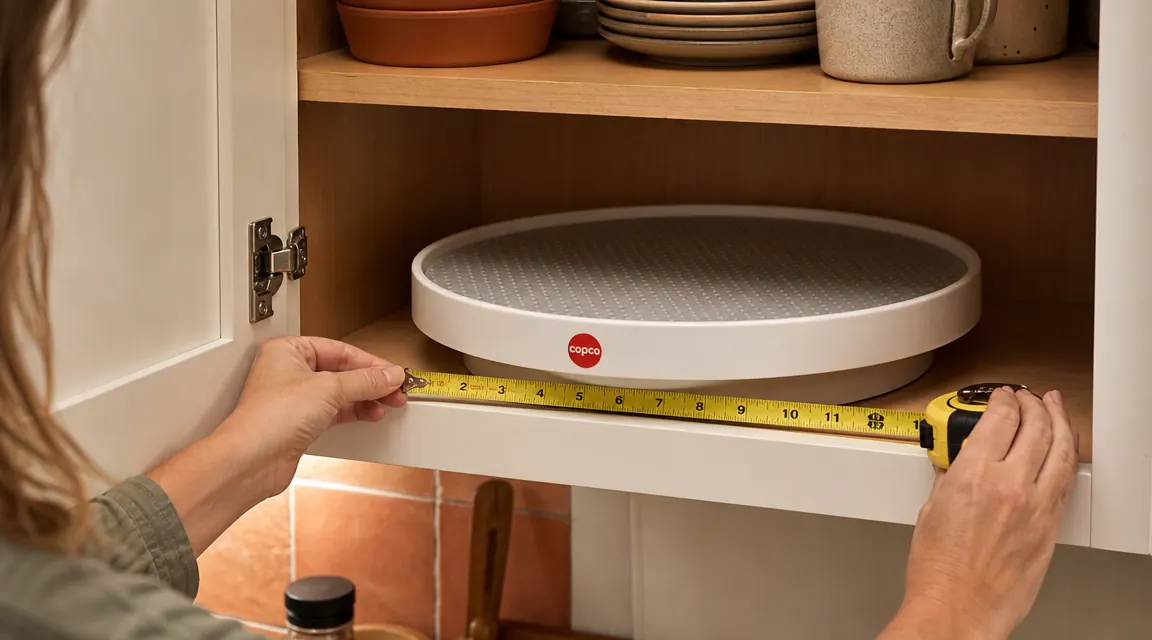
Pull everything out of the cabinet you want to tackle. Set it on the counter or the floor so you can see the bare shelf. Then grab a tape measure and note three numbers: interior width from side wall to side wall, depth from the front edge to the back wall, and clear height from the shelf surface to the shelf above it. Write them on a sticky note. You will absolutely forget the exact inches by the time you open Amazon.
A 12-inch turntable fits comfortably in any cabinet that is at least 13 inches wide. If you have a corner cabinet or a wide pantry with 18 or more inches of clearance, you can run two 12-inch turntables side by side or step up to a 16-inch model. For height, the Copco sits just under one inch tall at the base, so it works on any standard shelf with items shorter than about 14 inches. Taller bottles in a cabinet with 16 inches of vertical clearance are fine.
Do not skip this step or guess. I ordered a 16-inch turntable for a cabinet that was only 14 inches wide once and had to return it the next day. A few inches matters at this scale. You also want to note whether your shelf has a lip at the front edge: some shelves do, and a low lip can catch the turntable base and stop it from spinning freely if you push it forward too far. Knowing this before the turntable arrives saves you the frustration of discovering it at installation.
Step 2: Sort Everything Into Groups Before It Goes Back In
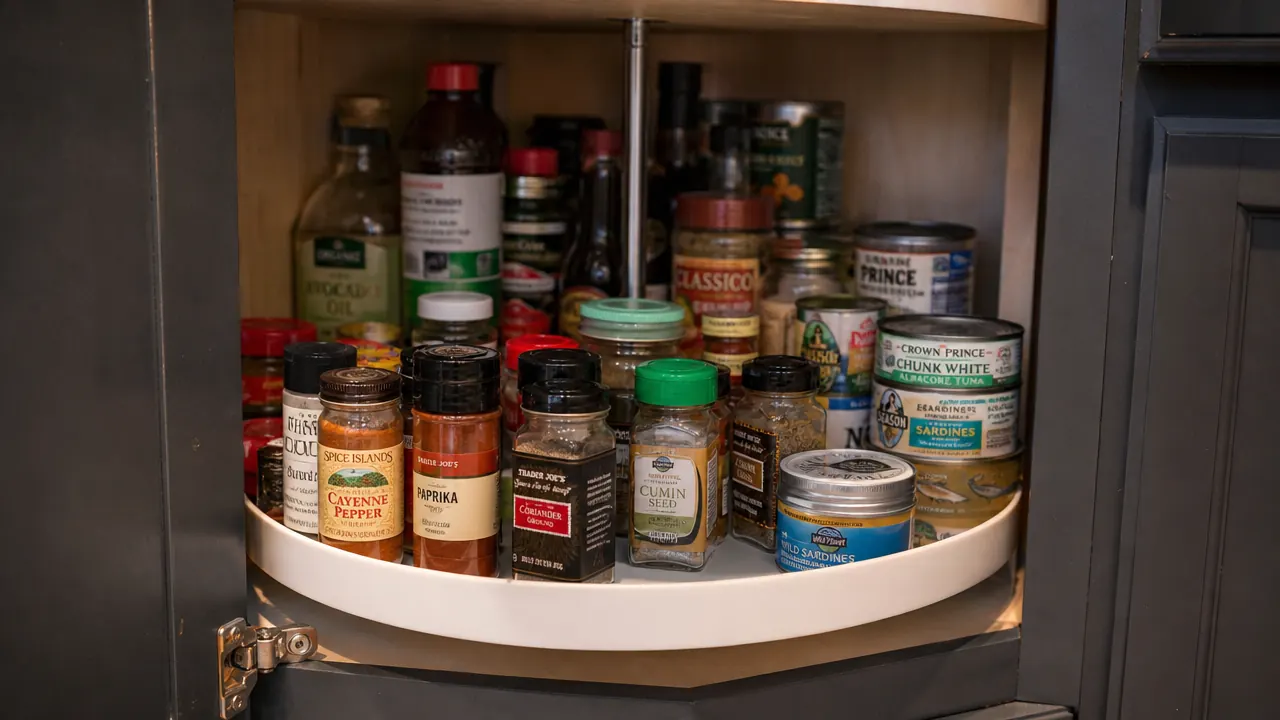
While the cabinet is empty, sort what was in it into groups on your counter. The grouping logic you use matters more than the turntable itself. Think about how you actually cook or reach into the cabinet, not how a magazine would photograph it. My groups are usually: oils and vinegars, spices and seasonings, baking supplies, and canned goods. Your groups will look different depending on what you cook and which items you reach for most.
The goal is that each spin of the turntable delivers one category into your reach. When you are making pasta, one spin brings your olive oil and garlic powder to the front. When you are baking, one spin brings your vanilla and baking soda. If you mix categories randomly, you will spin endlessly looking for one thing, and the turntable will stop feeling like a solution and start feeling like another annoying step between you and dinner.
Also use this moment to throw out anything expired or stale. Every single cabinet I have emptied had at least two things past their date hiding in the back. A bottle of fish sauce from 2022. A spice blend that went solid. Getting rid of them now means your new system starts clean instead of just reorganizing the same old clutter into slightly tidier piles. The edit is part of the setup.

Step 3: Place the Turntable and Load It With Intention
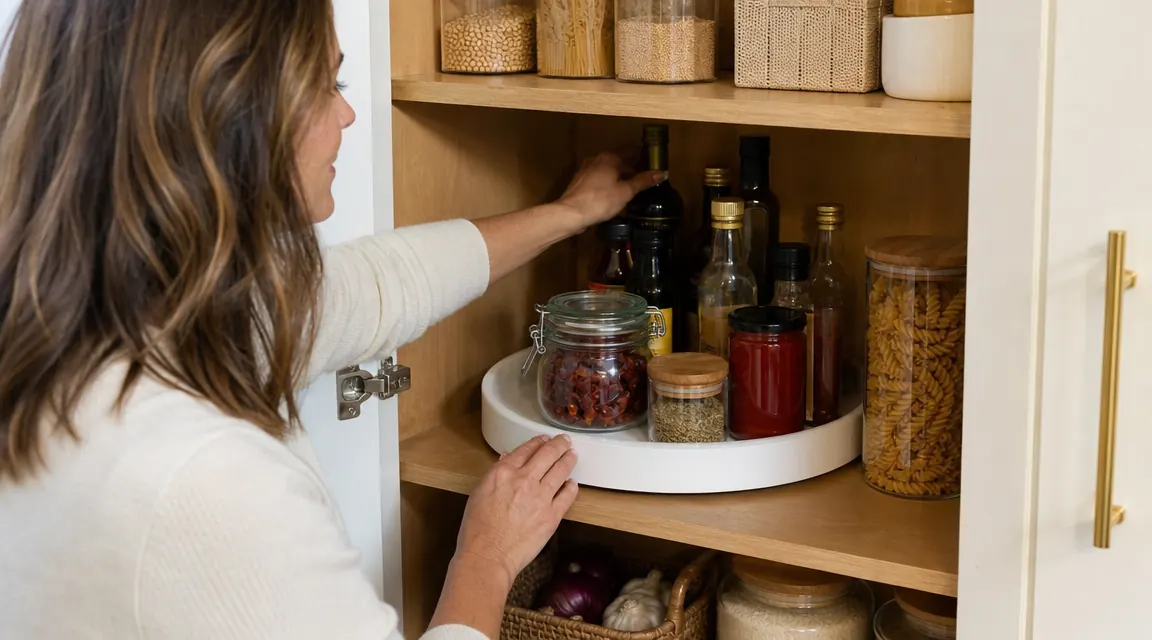
Set the Copco turntable on the shelf roughly centered in the cabinet. The non-skid base grips the shelf surface without adhesive or hardware, so you do not need to stick it down or drill anything into the shelf. This matters a lot if you rent. You can also move it later if you want it on a different shelf or need to swap which cabinet gets the treatment. No commitment.
Load your heaviest, tallest items toward the outside edge of the turntable first. Oils, vinegar bottles, tall cans. Those are your anchors and they belong near the rim where the platform is most stable. Shorter items, like spice jars and small packets, go toward the center or in the gaps between the tall items. The weight distribution matters: a turntable loaded heavily on one side will try to spin itself when you reach in, especially on a shelf with any incline. Balanced loading keeps it sitting flat and still.
Do not try to fit more than one full rotation worth of items on the turntable. If you are stacking two cans on top of each other or jamming items together so tightly the turntable drags when you spin it, you have too much on it. Move the overflow to the front zone instead. A turntable that spins freely with eight items on it is worth more than one that is technically holding twelve but requires two hands and a prayer to rotate. I cover how the Copco's base material holds up under this kind of daily use in my two-year Copco lazy susan review if you want the full wear report before you buy.
Step 4: Use the Front Space to Handle the Overflow
One turntable does not solve a cabinet with forty items in it. After you load the turntable with your highest-priority group, look at what is left on the counter. Whatever did not fit goes into the space in front of the turntable, nearest the cabinet door. That space is your fast-grab zone: things you reach for daily, like the salt you use every night or the coffee filters you pull out every morning before you are fully awake.
The rule for the front zone is that it should never require you to move something to get to something else. One row deep, no stacking, no piling. If you find yourself stacking items in the front zone within the first week, the cabinet has too much stuff in it and it is time to do another edit pass, not to figure out how to stack things more cleverly.
Some cabinets have enough depth to run a second turntable directly behind the first. If yours does, the back turntable becomes the home for your least-used items: backup stock you rotate in, specialty ingredients you pull out once a month, things you need occasionally but not daily. The front turntable holds your weekly staples. Two turntables with a clear category split between them is the cleanest version of this system, and it makes even a 24-inch-deep cabinet fully functional.
Step 5: Test the Spin and Adjust Before You Call It Done
Close the cabinet door, step away for a minute, then come back and do a real-use test. Pretend you are making dinner and you need your olive oil and your garlic powder. Reach in, spin the turntable, grab both items, and close the cabinet. Did it spin without catching anything? Did you get what you needed in one motion? Could you do it without nudging anything in the front zone out of the way? If yes to all three, the system is working.
If the turntable catches on a shelf lip or a taller item brushes the shelf above it when you spin, adjust the placement. Sliding it back half an inch often clears a front-lip problem. If a tall bottle keeps leaning forward when you spin, it is top-heavy and needs something shorter behind it for support, or it belongs at the outside edge of the platform rather than toward the center.
The test step matters because a system you actually use daily beats a system that photographs well but frustrates you at 6 p.m. on a Wednesday when you just need the paprika. Give yourself five minutes to adjust before you call it done. The Copco's non-skid base means you can reposition it as many times as you need without it leaving any marks on the shelf surface.
What Else Helps
The turntable solves the reach problem, but a couple of other habits make the system last. First, hold a rule that nothing lives directly behind the turntable without a category reason. The moment that space becomes a catch-all for miscellaneous overflow, the turntable becomes harder to spin and the cabinet creeps back toward chaos. Second, label the zones. I place a small strip of tape on the shelf surface in front of each section with one word on it: spices, oils, baking. When other people in the house open the cabinet, they know where things go back. Without that label, everything slowly migrates to wherever there is visible space, and within a month the groups you built have dissolved. A handheld label maker solves this in about three minutes. If you want a fuller breakdown of why this approach works better than re-reorganizing every few weeks, see the list of 10 reasons a lazy susan fixes cabinet chaos for the specific mechanics.
A turntable that spins freely with eight items is worth more than one holding twelve but dragging. If you have to force it, you have too much on it.
You measured, you sorted, you know it works. Now get the turntable.
The Copco 12-inch Non-Skid Lazy Susan is the one I have used in three different cabinets over two years. It has not warped, the non-skid base still grips, and it has never tipped a bottle in either direction. Over 25,000 buyers rate it 4.7 stars. Check today's price on Amazon and see if it ships in time for your weekend project.
Amazon Check Today's Price on Amazon →